Followers

Index of RecNaL.Blogspot.Com

http://www.recnal-index.blogspot.com

Extreme Overclock

Extreme Overclock :

What happens when a CPU heatsink is removed

What happens when a CPU heatsink is removed :

Fast Link

Thursday, December 10, 2009

How To: Increase Notebook/Netbook Battery Life

Most of people don't know how to make battery's life longer or to keep battery long working when we're not using power cable. There have a few steps to do this.

1. Disable wireless signal

When you are not using wireless, turn it off or disable it. Most of notebook or netbook now have button to disable wireless. It's can save your battery time because wireless can use a considerable quality of power.


2. Low backlighting screen

By using low backlighting on your notebook or netbook will help you spend more time. Less backlighting mean less using power from your battery. See picture below


Fn Button with volume & backlight function

3. Low volume

Same as backlighting, if you using low volume, it's can safe your battery power. See picture above.


4. Using correct power scheme

Windows contain a number of predetermined power plans, which control settings like how rapidly your notebook or netbook turns off and when your screen saver boots in.

Control Panel > Power Options

For max. Battery life from the "Power scheme" chooses the option "Max. Battery" and decline the list. There are good choices for you just like "Low Power Mode" and Portable /Laptop. They don't conserve as much power as Max Battery. After selecting a power scheme you click Ok button to finish the process. See picture below


For more power of time from battery, upgrade your battery. Buy new battery with more cell's which can stay uptime more example 4 hours, 6 hours or 8 hours. Extra tips, if you in your house which have plug outlet, take off your battery and just using power cord only. This tips can make your battery long life.

Saturday, December 5, 2009

How To: Format USB Devices to NTFS

Normally our pendrive or any USB devices in FAT (file allocation table) file system, FAT16 or FAT32. NTFS (New Technology File System) is better than FAT. For more info about that, feel free to read here.

Ok now how to convert from FAT to NTFS ? This is the tutorial about how we do it. Let we start with plug in your pendrive or any USB devices with your computer. Then follow the instructions below.

1. Right click on your My Computer icon at desktop
2. Select Properties > Hardware > Device Manager
3. Select Disk drives & select your USB devices
4. Right click & select Properties (see pic below)


Device Manager


5. Policies > Optimize for Performance > OK (see pic below)


Device Properties


6. Open My Computer
7. Right click your USB devices & select Format (see pic below)


Format USB Devices


8. Format your USB devices & change file system to NTFS (see pic below)


Done, now you can make your USB devices bootable which requires NTFS Format.

Friday, December 4, 2009

How To: Make Pendrive as a RAM

This steps good for who has slow PC running Windows XP. For good performance Win XP need 256mb of RAM or more. So if you have less than 256mb, better try this. This is step by step how to make pendrive as a RAM.

1. Plug in empty pendrive
2. Let the PC do what ever its want to do
3. After finish, right click on My Computer
4. Goto Properties > Advanced > Performance Settings
5. Advanced > Change
6. Select your pendrive & click on Custom Size
7. Enter the same amount in the Initial and the Max columns

Now you just used the space of the PenDrive as a Virtual Memory for your computer. I suggest you to used 1GB pendrive or 2GB pendrive or more big size in step 1. Good luck >>:)

p/s: for the best result, please used hi-speed rate transfer pendrive.

Thursday, November 26, 2009

Folder Option Missing


Regwash - portable

This problem normally cause of virus. After system effected by virus, you will get problem with folder option, task manager, cmd and so on. How to fix it? Very simple, firstly scan your computer with any remover or anti virus. I recommend you scan using trojan remover (portable - download here) and AVG Free. After that download this application (Regwash-portable). Hit registry tab and check any box you want and hit "Repair Registry" button. Restart your computer and check is it working or not. Easy as A B C >>:)

Safe Mode Problem


Portable Autorun Virus Remover 2.3

Safe mode not working ? try download this application (Password: recnal.blogspot.com). This application portable type, no need installation. Click on "FixSystem" to fix the problem. If still not working, scan your system using Regcure http://download-recnal.blogspot.com

If still not working, try this:
- Click on Start > Run, type "msconfig"
- Then click on the "Boot.ini" tab
- Then CHECK the "/SAFEBOOT" option
- Then click on Apply, then OK
- After you've finished in Safe Mode, then open "msconfig/Boot.ini tab"
- Then UNCHECK the "/SAFEBOOT" box.

Good Luck >>:)

Wednesday, October 14, 2009

How To: Clean up Power Supply

There have many reasons why we need clean PSU from a dust. To make PSU more long life, not too high temperature, not too noisy. What ever the reason it is, this is step by step how to do it.


1. Turn off your computer
2. Unplug the power cable connect to PSU
3. Take out the PSU from computer casing
4. Take screw driver & loose 4 screws at each edge of PSU


after take out from computer case


5. After screw, take out the top of PSU case. See the picture below


Can see clearly inside the PSU


6. Remove all dust using paint brush


Brush the fan


Clean the dust at transformer & other
components

7. After finish, put the top case back
8. Install PSU inside computer casing
9. Plug all connector back such as to motherboard, cdrom drive, hdd, fdd as before
10. Turn on your computer.

That's it, it's very simple. For safety, please don't touch any electric & electronic components using your hand

Monday, September 7, 2009

DirectX 10 for Windows XP (RC2 XP Fix 3)

Remember this topic; 'DirectX 10 for Windows XP' ? That time DirectX 10 for Windows XP still in alpha version. Which is if you using it, under your own risk. Today new version has been released DirectX 10 RC2 XP Fix 3. Before this there is no exe installer, but now DirectX 10 for XP comes with more fun and easier. Latest DirectX 10 XP installer patch that easily installing all the important DirectX10 DLL on Windows XP 32. Meanwhile, this DirectX10 installer program support Windows 2000 and Windows 2003.

Follow this step by step how to install DirectX 10 for XP:

1. Download DirectX 10 RC2 XP Fix 3
Password: recnal.blogspot.com

2. Install it and follow the instructions (see picture below)


3. Click finish button


4. So as pictures show bellow, it's finish and your winxp now have DirectX 10.


Personal review:


Computer spec
- Intel Core 2 Duo 2.53GHz
- 3Gb DDR2 667
- XP 32bit
- 512mb / 128bit GeForce 8500 GT Super

After finish installed the DirectX 10, I try to find out what the different between DirectX 9 and DirectX 10 on my PC. So I try with 'Tom Clancy's Hawk' games. I realize the big different with smoke. It's more realistic. I'm surprise with that.

For gamers out there, you should try this DirectX 10 using on XP. It's cool and don't forget tell what different you got.

Wednesday, August 26, 2009

Tutorial: Fix Error(s) on HDD

There have 2 different ways to fix errors on hdd. From windows or from MS-DOS command prompt. Sometimes we can just using it from windows but sometimes need from dos.

How to fix error on harddisk drive from windows:

1. Click My Computer
2. Right click on partition you want scanned
3. Select Properties

(see picture below)


4. Click Tools > check now
5. Thick 2 boxes and click start button

(see pictures below)

- Do it same as step no.1 to no.5 for different partitions
- If C:\ system will restart and starting scanned. System will not scan in windows mode


Remember, we cannot always depend on windows only, some cases need scan from DOS. So this is the step by step how to do it.

Before we start, make sure your computer first boot is from cd-rom drive. Otherwise change it first and after that follow step bellow:

1. Insert cd windows xp in cd tray
2. Start computer and boot it (from cd-rom)
3. Press "R" for repair and press "1" (normally) and hit enter for password. If you have password, please key in, if not just hit enter.
4. At Prompt type this command

CHKDSK /P /R

(see picture below)


please using CHKDSK /P /R for repair errors otherwise system just scan not fix the problem completely


Step for change directory before scanned: (pic above)


Result after scanned at D:\

Ok, you should try this if your computer not working normal or cannot logon windows or always restart after logon windows. Anyway, this step good for maintenance too. I did this if I do maintenance on my computer (scan from windows). If your problem cannot logon windows, follow this step and type this command after scanning complete FIXBOOT C: and press enter.

p/s: For windows XP. not working on Win95/Win98/WinME

Thursday, August 13, 2009

TrayIcon Problem Fix

I've got a few request regarding this little bug of Windows XP not showing the TrayIcon (LAN icon, Anti-Virus, Winamp Agent, Winrar Agent etc ) despite many programs are indeed running on the background thus driven me to write a little guide as how do we solve this. This problem became a common issue in XP nowdays by the way

These solutions applies to Windows XP Pro SP1, SP2, & SP3 but it may works on Home Edition as well. So lets get started shall we

Solution 1

This step involves modifying some registry value so it must be done correctly as any mistake could be catastrophic. To make things safer, i would suggest to use this small tool to point you to the correct key.

Download Goto.exe and save it at desktop. Run the tool, it will open up a small box, and copy-paste below text into the box.

HKEY_USERS\S-1-5-21-2000478354-1563985344-1417001333-1003\Software\Microsoft\
Windows\CurrentVersion\Policies\Explorer

Registry Editor will open and navigated to above location. Now click on 'Explorer' key, and you will see a string on the right pane with the name 'NoTrayItemsDisplay' . Double-click the string > Modify Binary > and put the value 00 00 00 00. If the string is not there, you have to create it. Right-click on empty space on the right pane, click New > DWord Value > name it NoTrayItemsDisplay. Now close Registry Editor and restart to see the changes

Solution 2

Download this little program called UnPlug n' Pray by Gibson Corps. What it does is it offers you the option to Disable Windows'
Universal Plug n' Play Service. This service is better leaving it disabled as this is also recommended by the FBI. And somehow, doing so will solve the problem with TrayIcon in many cases i've seen. Restart the PC after done using the program.

Note: The FBI's NIPC (National Infrastructure Protection Center) has apparently reversed their original opinion. They no longer assert that Microsoft's Universal Plug & Play services should be disabled for extra protection. The most recent update to their previous two notices — which did advise users to disable the UPnP services — no longer includes this advice.

As you will see below, we believe that the FBI's original security advice was correct. Leaving unneeded and potentially vulnerable Internet services running makes no sense. Doing so is foolhardy, pointless, and insecure. Why would you?

Solution 3

Download this simple file written by me.
XP-Policy-Default

After download, run the program and follow the instructions including 'Yes' when it prompt you for a restart. This solved alot of TrayIcon issues but its only meant for XP Pro.

Solution 4

Go to Start > Run > Type Services.msc
Scroll down and search for service SSDP Discovery Service, right-click the service and stop it. Then choose to disable this service.

Do the same for service Universal Plug & Play, Stop the service and set it to Disabled. Restart the PC after done with this step.

Solution 5

Download TweakUI.exe from Systernal.

Run TweakUI, and go to Taskbar & Start Menu. Make sure the option box for 'Show Taskbar & Notification Icons' is tick, and if it already selected, untick the box > Apply > OK > Exit TweakUI.

After that, run TweakUI again, go to that option again but this time tick the box and Apply > Exit. Maybe reboot is needed for the changes to applied.

Good luck folks !!

~ prepared by PirateCrew

Wednesday, July 29, 2009

OverClock Graphic Card

There have personal reason why people OC the GC. Normally for the better performance. Before you start OC your GC, please understand; when you force your GC work more, heating will increasing. So please do on your own risk or put extra fan for your GC and mboard.

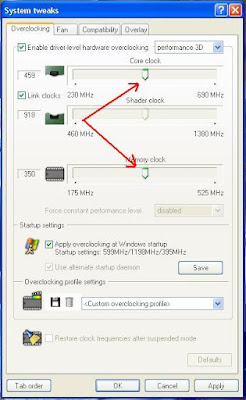
Riva Tuner is the one of applications we can used for OC the GC. Follow the step by step how to do it.

1. Download Riva Tuner & install in your pc
(Download here) password: recnal.blogspot.com
2. Download & install EVEREST software (optional)
3. Run your Riva Tuner


4. Click the button as picture show above


5. Click on "System Settings"


6. Move the tab to the right (core clock). My default GC was 459MHz (core clock) & 350MHz (memory clock) and I will move the tab for core clock to the new value 600MHz & memory clock 450MHz

Core Clock = 459MHz ---> 600MHz ( 30% increasing )
Memory Clock = 350MHz ---> 450MHz ( 30% increasing )

7. Click apply & Ok button


See picture above (after Overclock)


Picture above show new value after OC & picture below show the temperature of graphic card.


Test your computer with play any games with heavy graphic (not a solitaire game LOL). Did you feel any different now? Please check your new temperature read after overclock with EVEREST software. If you have very big different temperature reading before and after OC, please upgrade your cooler system for your mboard (north & south bridge) & graphic card fan or heatsink. Or tab down to the new value with lower value or else it's gonna blow (joking ekekeke). Me ?? I just put one extra fan for my GC, RAM & north bridge.

Monday, July 27, 2009

Display problem - laptop

No display suddenly? Got vertical line or horizontal line on the screen? Or your screen blinking? or white screen? How to check? Very simple, please follow this step below.

1. Connect your laptop with normal monitor (CRT or LCD monitor)


2. Switch on your laptop


RESULT:

i) If display show up in monitor without any problem (not your LCD laptop)
- what ever problem it is, white screen, no display but system running, got line in LCD laptop or any else, your laptop might be problem with the LCD. Need change with new one

ii) If display doesn't show up in monitor
- make sure connection between vga port from laptop and vga cable from monitor is correct. If still doesn't change, your laptop might be problem with the chip inside the laptop. Need replace it.

iii) If display show same problem in monitor and in your LCD laptop
- in this case, your laptop might be problem from the chip in side the laptop. Need to replace it with new one and you laptop will be back to the normal.

iv) Others
- if any else, you need to sent your laptop to a shop

If you send your laptop without you as a owner check it first, a technician will check with the same way. Why I said like that?I got this tips from a technician who sleep with laptop and eat with laptop ekekekeke.

If you need buy a new LCD for laptop, the price around RM450 - RM650 and if you need change the chip the price around RM250 - RM350. Remember one thing, the price sometimes go up and sometimes going down.

p/s: sorry i cannot remember the chip name ekekeke

Friday, June 26, 2009

Troubleshoot: Laptop Cannot Start

'My laptop cannot start after press start button', that's the famous problem nowdays, I also have same problem with 2 or 3 laptop this month. How to solve this problem? Follow this step to troubleshoot in DIY before you decide to send your laptop at repairing shop.


/* make sure turn off electrical power first for safety before or after what you did */

STEP 1:
1. Unlock battery and pull out the battery
2. Plug the power cord and switch on
3. Switch on your laptop with start button


STEP 2:
1. Make sure you try STEP 1 first
2. Put the battery back
3. Try switch on your laptop with start button; or
4. Connect power cord and switch on plug and try switch on your laptop with start button


STEP 3:
1. Open back panel and pull out your memory (RAM)
2. Scrub with rubber at copper area (yellow bar)
3. Put it back and try switch on

STEP 4:
1. Open back panel and pull out your HDD carefully
2. Put it back and try switch on

STEP 5:
1. Connect your laptop with others power cord but same shape so the power cord fit with adapter
2. Try switch on your laptop with start button

STEP 6:
1. Connect your laptop with others adapter & power cord **
2. Try switch on your laptop with start button

STEP 7:
1. Connect your laptop with monitor
2. Try switch on your laptop with start button
3. There have display in monitor, that's mean your LCD have problem

STEP 8:
1. Make sure you try all step's from STEP 1 to STEP 7
2. Doesn't work ?
3. Sent your laptop to repairing shop for more and better troubleshoot

** make sure you using other adapter with same voltage and ampere or else your laptop will burn out because of over voltage

Thursday, June 18, 2009

TIPS: Warranty for Computer Hardware

Normally before we buy something, we will asked about warranty of product. 1 week, 1 month, 3 months, 6 months, 1 years, 3 years or life time warranty. But there is something you need to know, example last Monday I bought 2 unit 160GB SATA HDD for laptop and the salesman said the HDD 3 years warranty. Actually the HDD 1 years warranty from the shop and 3 years warranty from factory. If the HDD having problem in 1 year period, you no need pay anythings but if the HDD having problem after 1 year (still in warranty time), you need to pay some money for the service charge.

They (shop) will not tell you everything unless they are your friends or buddy. If you try to claim warranty, you will brings resit along to the shop. Do you remember, before this if we buy something shop will write down something in warranty card, remember that? But nowday no more. Why this happen? This is because everything register from Internet. This is what I'm gonna tell you and why i post this topic.

If you buy something new like monitor, did you register it from internet for warranty?? The answer is NO. Actually I'm not sure is this very important or not because it's depend on factory. But better we get prepared before trouble comes.

If you buy a new laptop, did you register for the warranty from internet? Same question and the same answer is NO. Better you do that. Just login internet and register it. My friend who selling a new laptop some where in capital town said, after you go home (after buy new laptop), login to internet and register by yourself for warranty. If not difficult to claim warranty if have any trouble.

This is a quick link for register your new product that I have in my bookmark

1. Acer product
2. Samsung product
3. Lexmark product


p/s: before it's too late ehehehe

Tuesday, June 16, 2009

DIY: Format Desktop or Laptop

There have a few steps to do before you can start format your own pc.

1. Back up your important file's or documents
- Transfer all your files in others partitions, pendrive, CD or DVD or anywhere else's

2. Back up your driver

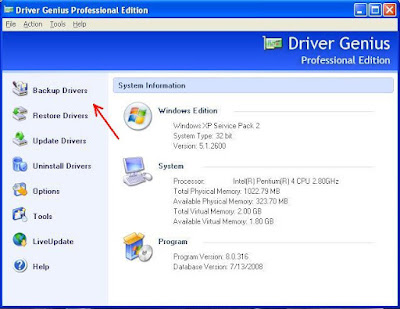
i - Download 'Driver Genius Professional Edition', it's portable. (click here) Password: recnal.blogspot.com
ii - Run the application and click on 'Backup Drivers' (see below)


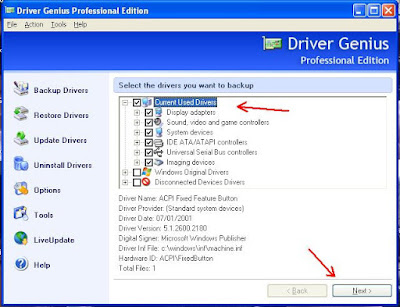
iii - After a few moments, thick on the 'Current used drivers' box. (see below)


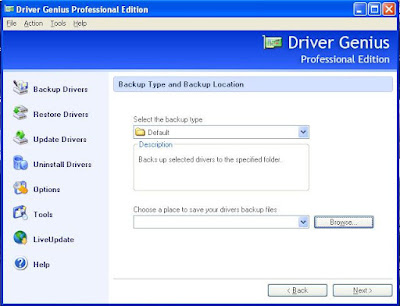
iv - Choose backup type (use default) & your location to save. (see below)


v - Transfer the driver files in save place (pendrive or something)

Now you are ready to start format your system. We go next step....

3. Boot from cd / DVD
Put Cd Windows XP in CD tray & restart your computer. In this step, system will boot from cd. Make sure you change the boot order from BIOS first or else some others system can change the boot order from just press 'F - key'. It's depand

4. Don't select repair while this process.

5. Press F8 on this step. (see below)

6. Create partition
- If your hdd have partition already, make sure you format partition C:\ only (system) or else you will lost all backup data which you transfer early.
- Press 'C' to create partitions & enter any amount you want to. Better more than 20GB for partitions C:\ (system). (see below)

(this picture for example)


- After finish create partition, format the partition. On this step, select NTFS & quick format


7. After that just follow instruction on screen.

8. After finish install windows, install all hardware driver using backup driver you did early.
- Goto desktop
- Right click on 'my computer' & select 'properties', click on 'hardware' tab and then 'hardware device'.
- You will see many hardware not install yet. How do you know? Can you see the yellow mark on it? that's mean the device not install yet.
- Right click on it, example 'VGA Display' and select update driver. Browse the files driver where you keep in save early.
- Do it again with others device until you see there is no more hardware not install yet.

9. Test hardware
After finish test all your hardware such as, display, audio, network or wireless, webcam an so on.

10. Install software
Install all software you need in your computer such as Quicktime, antivirus, winamp an so on
(click here to download)

Ok now you done do it yourself and save money ehehehehe

Thursday, June 11, 2009

Attrib Command

Attrib is a command we can used it in MS-DOS (OS/2 & Windows). We use it for set or remove any file's attributes such as 'hidden', 'archive', 'read-only', 'system'.

H = Hidden
S = System
A = archive
R = Read-only
+ = set a file to any attributes
- = remove a attributes

ATTRIB [+R | -R] [+A | -A] [+S | -S] [+H | -H]

/S = Processes files in all directories
/D = Process folders as well

Ok let's play with it. Firstly you need a file to do it. So create file using Microsoft Word for example .

1. open Ms-word & type your name
2. File > Save As
3. give the file names (example: LaNceR.doc) and save the file in C:\ (not in my document)

Now you have example file to do it. Next let's we test play with attrib command.

1. Start > Run > CMD (type and press enter) - Command prompt will show up
2. type this command C: \ (press enter) - there have space between C: and \
3. type DIR (press enter) - locate you example file that you created, my file names LaNceR.doc
4. type this command for set the files attributes Read-Only

attrib +R LaNceR.doc (press enter)

5. now go back to the windows and open your file (mines is LaNceR.doc) and type something new text on it and try save the file with the same name. Look what will happened. This happen because you has set the file as 'Read-only'. If you want remove the 'hidden' attributes for the files, use this command

attrib -R LaNceR.doc (press enter)

So you can try with others syntax such as A, H, S. I give some tips, how do we do it if a some of kind virus hide all your file's in specific folder? Example the missing file is Ms-Word (.doc) and specific folder is 'my documents'.

First you need goto the directory path. Our last path was C:\ right? So type this command

CD Documents and Settings\JuHaNa\My Documents (press enter)

Now you in 'My Documents' path/folder.

Used this syntax : attrib -h *.doc

If the virus hide all file's in the folder, you can use wild card

Used this syntax : attrib -h *.*

but the problem is, nowdays system more high security and prevent user from using mass command or wildcard. The best is, try and error

Tuesday, April 28, 2009

How To: Run Safe Mode

What is safe mode?

Refer to Wikipedia, safe mode refers to diagnostic mode used by a computer operating system which refer to a mode of operation by application software. When we run in safe mode, system will reduced functionality (many non-core components disabled).

In safe mode also, common virus or spyware will not active or fully functioning (or not function at all). So to solve any problems better in safe mode. Have you having problem with a virus or spyware cannot remove after scanned? Try in safe mode you will find the situation will changed.

What will happen in safe mode?

- display will set to lowest bit which you will find your wallpaper will turn to ugly view
- no sound
- no network connection
- no internet connection
- antivirus not running
- many more

So don't panic with what will happen.

How to run safe mode?

It's simple actually, when we turn on a computer, beep sound will come and system will running POST (Power On Self Test). On that time press F8 key on keyboard, then select safe mode (selection number 1) and press enter twice. When your system login to windows, dialog box will come out, just press spacebar. Now you in safe mode.

p/s: Try press F5, no selection menu just direct to safe mode >>:)

Tuesday, March 31, 2009

How To: Tune Low Spec PC in WinXP

The situation is like this; you have old pc with low or very low spec but running windows XP. The problem is your pc running very slow. So how to solve this problem? After I read from others website and try my luck, there is a couple of ways to tune up pc with low spec.

Step 1
Use "Windows Classic Style"

On desktop > right click > properties > Appearance

Select Windows Classic Style on Windows and button. Your computer will using low memory
after that.


Step 2
Change Performance

On desktop > right click on my computer > Select Properties > Click Advance tab

in performance area click on setting and then click on "Adjust for best performance". Using low memory can boost your computer performance.


Step 3
Using plain wallpaper

Change your wallpaper with no picture, mean choose "none" for your wallpaper. Less using memory for desktop wallpaper can make your pc have more memory for other purpose.


Step 4
Change startup setting in msconfig

Start button > Run > type "msconfig" than enter

Click "Startup" tab and disable any programs that you think not very important running in startup.


Step 5
Change service setting in msconfig

Start button > Run > type "msconfig" than enter

Click "Services" tab and disable

- Indexing service = Indexing service creates a database index of all files on your system when the system is otherwise idle. Unless you do frequent searches, it is suggested you disable this service.

- Help & support

- IMAPI CD-Burning COM service = You can disable this service if your computer have no cd-burner

- Task Schedule = Disable this if there is nothing used it

- Windows Firewall / Internet Connecting Sharing (ICS) = If you like me, not like using firewall in WinXP, you can disable this service


Step 6
Disable "Autoupdate"

Control panel > Administrative Tools > Services

Double click on "Automatic Updates", click stop button, and select disable in "startup type"


Step 7
Delete "Prefetch File"

Goto \Windows\Prefetch and delete all files in the folder prefetch


After all step's, please restart your pc. For the step number 7, please do not doing it repeatly always. It's ok doing it every 3 months. Uninstall program that you think never used it, defragment you hdd for better performance and using antivirus that less using memory.

Monday, March 30, 2009

Troubleshoot: NTLDR missing

When you start your computer you will see this msg come out on the screen

NTLDR missing

What is NTLDR ? NTLDR stand for NT Loader and it is the boot loader for all release of Microsoft Windows NT Operating System. So how to fix this problem?? Very simple

1. Boot your computer using cd XP

2. Select "Repair Console" by pressing "R"

3. Press "1" and insert password (or just press ENTER)

Let's say your CDROM Drive in your computer is drive E:

4. Copy "ntdetect.com" & "ntldr" to your primary partition (normally it is C:\ ) type this command:

copy e:\i386\ntldr c:\

after that type this command

copy e:\i386\ntdetect.com c:\

5. Take out your cd from cd tray and restart your computer.

Troubleshoot: Windows could not start because the following files is missing or corrupt: \Windows\System32\Config\System

What would you do after you did something to your computer maybe install or uninstall any applications then restart your pc after you see this error msg:

"Windows could not start because the following file is missing or corrupt: \Windows\System32\Config\System"

Don't worry or panic. Just follow this step bellow

Option 1: Using CHKDSK command

1. boot your computer using cd windows

2. Select "Recovery Console" by pressing button "R"

Normally press number "1" & enter your admin password after that. (or Press ENTER)

3. At command prompt type this;

CHKDSK /P

4. After finish please reboot your computer.


Option 2: Using backup from system restore

1. boot your computer using cd windows

2. Select "Recovery Console" by pressing button "R"

Normally press number "1" & enter your admin password after that. (or Press ENTER)

3. At command prompt type this;
cd "C:\System Volume Information"

4. Here, locate and navigate to the folder whose name begins with _restore using the command:
cd _resto~1

This folder contains many subfolders which have names of the form RPxxx, where xxx is a number indicating the restore point. Locate an RPxxx folder which has the highest number as its suffix (highest xxx) using the command dir command. Then navigate into that folder using the command:
cd RPxxx (don't forget to replace xxx with the corresponding number)

5. Now, there will be a folder named snapshot. Navigate to this folder using the command:
cd snapshot


6. There should be a file named _REGISTRY_MACHINE_SYSTEM, copy this file to the \Windows\System32\Config folder with the name System using the command:
copy _REGISTRY_MACHINE_SYSTEM C:\Windows\System32\Config\System

7. Reboot the system and check whether Windows loads properly.


Option 3: Using Windows Repair

1. While installing Windows, the setup backs up the System registry hive in Repair folder. If the System Restore feature is turned off, then this backup can be used to restore the System hive. From the Recovery Console, navigate to folder \Windows\Repair, using the command:
cd C:\Windows\Repair

2. Copy the System file to its original location using the command:
copy System C:\Windows\System32\Config\System

3. Reboot the system and check whether Windows loads properly.


With this step, I tried Option 1 & Option 2 and it's work fine on me. Never try Option 3 yet >>:)


Having problem to access folder? Make sure when you type cd to access folder file, you need type quotes. Example cd "system volume information". This is because of the spaces. But when you try to copy the file, don't using quotes.

Tuesday, March 10, 2009

Something Need To Know Before Buy a New Motherboard

There is a lot of type & brands of motherboard in market. But most of you not really know how to choose what should you know before buy it. This is a simple list of motherboard which almost people buy in market

- ASROCK
- ASUS
- MSI
- GIGABYTE
- INTEL

1. Firstly you need to know which socket you should buy. If you using Intel cpu example Core 2 Duo, you need motherboard 775 socket.

2. If you plan to use memory which more powerful like example 800DDR2 PC6400, make sure you motherboard support for that

3. If you plan want use it for maximum memory, check the motherboard how much memory max it's can support. 2gb, 4gb or 8gb. My advise, 2gb better no need too much

4. Most of motherboard using chipset 7.1 channel audio, just double check before you buy it

5. Some of people using too much usb port, form me 6 port of usb is minimum, 6 usb port at back and 2 extra connection on board for front usb port

6. For gaming system, you need cooler (heatsink) at south bridge. It's doesnt matter if there is no fan out there, you can modify latter.

7. North bridge also same as part no.6

There is basic info you need to know. OK now this is part more difficult, which brand should we choose?? My opinion base on my experience. I have chit chat whit my friends who work as a technical department in computer accessories store some where in KL. There is 3 brand in top position. ASUS, MSI & GIGABYTE. ASROCK is a lower motherboard. INTEL motherboard having problem. How he knows? people who used Intel motherboard will having same problem. System cannot start.

How about ASUS, MSI & GIGABYTE and which one is better?? It's difficult to say but as we know ASUS has good motherboard. More stability and even Intel recommand ASUS. MSI have good configure which have max memory for display (onboard) without using memory as we attach on motherboard. You can get 380mb for display (onboard). GIGABYTE get credit from my friends who work as a technical department and he said he will choose GIGABYTE motherboard if want buy a new system for playing a games.

There is another tips. If you can see in price list, example MSI motherboard the code is MS-7529, G31M3-L. This motherboard have 3 years warranty from factory. How to know?? From the code. Can you see the code have G31 ?? That stand for 3 years warranty from factory.

MS-7529, G31M3-L

1 year warranty from the shop and 3 years warranty form factory. If you claim warranty in 1 years, you will get new motherboard without pay anythings but if after 1 year which you have 3 years warranty from factory, if you claim you need pay RM30 for transportation fee's.

Saturday, February 14, 2009

Computer Power Supply

Many people don't know or not sure which one or how many watt of power supply should used for computer. In this scenario, depend on what you do. Each hardware we attach on motherboard using some voltage and watt. This value different with each hardware.

This is some list of hardware with watt usage:
- Intel cpu
-> Intel Celeron socket 478 = 35 watts - 78watts **
-> Intel Pentium 4 socket 478 = 58 watts - 103 watts **

- VGA card = 30watts - 70watts **
- Memory = 7watts - 40watts **
- HDD (PATA/SATA SCSI) =25watts / each
- PCI Modem = 4watts
- NIC = 4watts
- Sound Card = 7watts - 18watts **
- SCSI Controller Card = 25watts

- CD-ROM = 20watts
- DVD-ROM = 25watts
- CD-RW = 20watts
- DVD / CDRW COMBO = 30watts
- DVD-RW / DVD+RW = 25watts
- ZIP Drive = 10watts

- USB Port (1.1 / 2.0) = 5watts / each
- IEEE Fire Wire = 8watts
- Fan = 2watts - 3watts **
- Internal Multi Memory Card Reader = 10watts

** depend on model / type

Before you buy new power supply, please read carefully sticker on power supply which will tell you how many watts peak and so on. (Power supply calculator)

Saturday, January 17, 2009

Streamyx Connection

Package Download
Speed
Upload
Speed

Streamyx 384kbps 384kbps 128kbps


Streamyx 512kbps 512kbps 256kbps
Streamyx 1.0Mbps 1.0Mbps 384kbps
Streamyx 2.0Mbps 2.0Mbps 384kbps


Streamyx 4.0Mbps 4.0Mbps 512kbps


Having problem with connection? Many user don't know about connection and easy to blame ISP. But sometimes it's right, ISP problem but most of us don't know how to do it even don't know about it.

I will tell what should you know about internet connection. Example, my connection is 1.0mb download / 512kbps upload. Once I connect, I will check my connection. I'm using modem router which have web management features. How to do that?


1. Open IE & type modem IP. In this case, my modem IP is 192.168.1.1

2. login to web management (using username & password)

3. Connect the line

4. See the connection speed

More about Web management (Related Link)
More about Networking (Related Link)

Why need check connection speed? Ok I give 2 situation

Situation 1
Still remember my connection? 1.0mb/512kbps right? If connection show 1.0mb donwload & 128kbps upload. My internet connection is very slow.

Situation 2
My connection show 1.0mb download & 512kbps upload. That time I have good connection

So how to fix this problem if your connection should be 1.0mbps download & 512kbps upload but you have 1.0mbps / 128kbps? Just restart your modem. In this case my Aztech modem router have button in web management to restart. it's take about 30 seconds or more to restart and after that see is it 1.0mb / 512kb or still 1.0mb / 128kbps ? If still 128kbps, please do it again (restart). It's simple

Imagine that 1 building with 2 door. 1st door goto inside (download) & 2nd door goto outside (upload). The building can park 1000 a cars at 1 time. If the building can have 1000 cars and 512 cars go outside, the building can have more space for a new cars come to park inside the building. But if only 128 cars go outside, we will have traffic jam with cars try to go inside. Something like that

AMD vs Intel

 
ss_blog_claim=33848eee9015378102742a58c7d46319