


Normally before we buy something, we will asked about warranty of product. 1 week, 1 month, 3 months, 6 months, 1 years, 3 years or life time warranty. But there is something you need to know, example last Monday I bought 2 unit 160GB SATA HDD for laptop and the salesman said the HDD 3 years warranty. Actually the HDD 1 years warranty from the shop and 3 years warranty from factory. If the HDD having problem in 1 year period, you no need pay anythings but if the HDD having problem after 1 year (still in warranty time), you need to pay some money for the service charge.
They (shop) will not tell you everything unless they are your friends or buddy. If you try to claim warranty, you will brings resit along to the shop. Do you remember, before this if we buy something shop will write down something in warranty card, remember that? But nowday no more. Why this happen? This is because everything register from Internet. This is what I'm gonna tell you and why i post this topic.
If you buy something new like monitor, did you register it from internet for warranty?? The answer is NO. Actually I'm not sure is this very important or not because it's depend on factory. But better we get prepared before trouble comes.
If you buy a new laptop, did you register for the warranty from internet? Same question and the same answer is NO. Better you do that. Just login internet and register it. My friend who selling a new laptop some where in capital town said, after you go home (after buy new laptop), login to internet and register by yourself for warranty. If not difficult to claim warranty if have any trouble.
This is a quick link for register your new product that I have in my bookmark
1. Acer product
2. Samsung product
3. Lexmark product
p/s: before it's too late ehehehe
Index of RecNaL.Blogspot.Com
Thursday, June 18, 2009
Tuesday, June 16, 2009
DIY: Format Desktop or Laptop
There have a few steps to do before you can start format your own pc.
1. Back up your important file's or documents
- Transfer all your files in others partitions, pendrive, CD or DVD or anywhere else's
2. Back up your driver
i - Download 'Driver Genius Professional Edition', it's portable. (click here) Password: recnal.blogspot.com
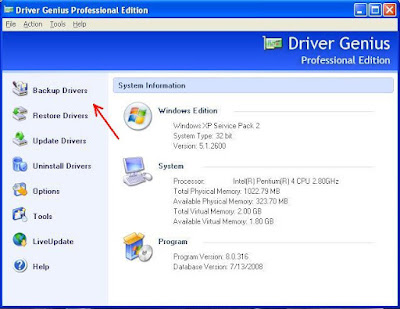
ii - Run the application and click on 'Backup Drivers' (see below)
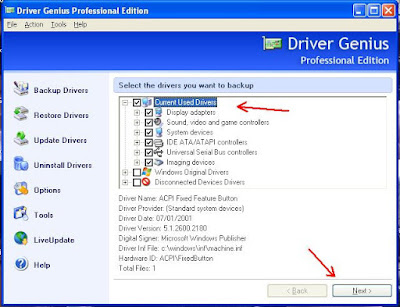
iii - After a few moments, thick on the 'Current used drivers' box. (see below)
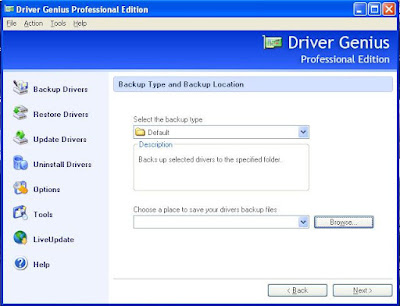
iv - Choose backup type (use default) & your location to save. (see below)
v - Transfer the driver files in save place (pendrive or something)
Now you are ready to start format your system. We go next step....
3. Boot from cd / DVD
Put Cd Windows XP in CD tray & restart your computer. In this step, system will boot from cd. Make sure you change the boot order from BIOS first or else some others system can change the boot order from just press 'F - key'. It's depand
4. Don't select repair while this process.
5. Press F8 on this step. (see below)
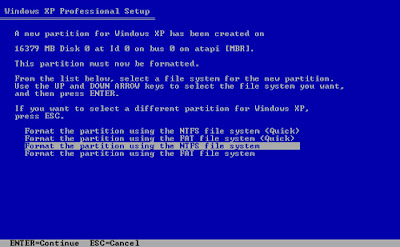
 6. Create partition
- If your hdd have partition already, make sure you format partition C:\ only (system) or else you will lost all backup data which you transfer early.
- Press 'C' to create partitions & enter any amount you want to. Better more than 20GB for partitions C:\ (system). (see below)
 (this picture for example)
- After finish create partition, format the partition. On this step, select NTFS & quick format
7. After that just follow instruction on screen.
8. After finish install windows, install all hardware driver using backup driver you did early.
- Goto desktop
- Right click on 'my computer' & select 'properties', click on 'hardware' tab and then 'hardware device'.
- You will see many hardware not install yet. How do you know? Can you see the yellow mark on it? that's mean the device not install yet.
- Right click on it, example 'VGA Display' and select update driver. Browse the files driver where you keep in save early.
- Do it again with others device until you see there is no more hardware not install yet.
9. Test hardware
After finish test all your hardware such as, display, audio, network or wireless, webcam an so on.
10. Install software
Install all software you need in your computer such as Quicktime, antivirus, winamp an so on
(click here to download)
Ok now you done do it yourself and save money ehehehehe
1. Back up your important file's or documents
- Transfer all your files in others partitions, pendrive, CD or DVD or anywhere else's
2. Back up your driver
i - Download 'Driver Genius Professional Edition', it's portable. (click here) Password: recnal.blogspot.com
ii - Run the application and click on 'Backup Drivers' (see below)

iii - After a few moments, thick on the 'Current used drivers' box. (see below)

iv - Choose backup type (use default) & your location to save. (see below)

v - Transfer the driver files in save place (pendrive or something)
Now you are ready to start format your system. We go next step....
3. Boot from cd / DVD
Put Cd Windows XP in CD tray & restart your computer. In this step, system will boot from cd. Make sure you change the boot order from BIOS first or else some others system can change the boot order from just press 'F - key'. It's depand
4. Don't select repair while this process.
5. Press F8 on this step. (see below)
 6. Create partition
- If your hdd have partition already, make sure you format partition C:\ only (system) or else you will lost all backup data which you transfer early.
- Press 'C' to create partitions & enter any amount you want to. Better more than 20GB for partitions C:\ (system). (see below)
 (this picture for example)
- After finish create partition, format the partition. On this step, select NTFS & quick format

7. After that just follow instruction on screen.
8. After finish install windows, install all hardware driver using backup driver you did early.
- Goto desktop
- Right click on 'my computer' & select 'properties', click on 'hardware' tab and then 'hardware device'.
- You will see many hardware not install yet. How do you know? Can you see the yellow mark on it? that's mean the device not install yet.
- Right click on it, example 'VGA Display' and select update driver. Browse the files driver where you keep in save early.
- Do it again with others device until you see there is no more hardware not install yet.
9. Test hardware
After finish test all your hardware such as, display, audio, network or wireless, webcam an so on.
10. Install software
Install all software you need in your computer such as Quicktime, antivirus, winamp an so on
(click here to download)
Ok now you done do it yourself and save money ehehehehe
Subscribe to:
Comments (Atom)


