This skills only for system Win95, Win98, Win98se & WinME
1. Clear all temp files, internet files
2. Restart system and press F8 and goto DOS environment
3. At C:\> prompt, type this command
C:\> scandisk/all/autofix (enter)
4. After finish, type this command
C:\> cd windows (enter)
C:\windows> scanreg/fix (enter)
5. Restart your pc by press Ctrl + Alt + Del
6. Defragment your all HDD partitions.
7. Restart your pc
Now your pc perform more speed. This is basic way to tune up your own pc. I used this trick for a long time ago and it's works.
tips: Your computer effected by virus? trojan? spyware? melware? what ever it's is, update 1st your antivirus or anti spyware application, restart system and run in safemode. Scan your HDD in safemode is better coz many applications disable in safe mode and make easy to remove it.
Followers
Index of RecNaL.Blogspot.Com
Extreme Overclock
Extreme Overclock :
What happens when a CPU heatsink is removed
What happens when a CPU heatsink is removed :
Fast Link
Saturday, June 28, 2008
Friday, June 27, 2008
HOW TO: buy computer casing
Many type, size, color and prize in market now days. Which one you like? So may be this guide can help you out before you buy new casing. Before it, state several info like your budget and purpose after that you can find which one you more like. Follow this guide before buy:
1. Size & weight
- most of computer casing have same size but different weight. Less weight is better so look what material they used.
2. Power supply
- once you buy computer casing it will come with power supply. Make sure the power supply have more than 400watt. Better is 450watt or 500watt. This is because one day you will using more usb port for pendrive, mouse, may be keyboard, printer, webcam, scanner, speaker. 1 usb port supply 5volt from power supply.
3. Fan
- This is optional. Some computer casing including blower fan back side and left side. Some others have in front side. If you think your computer system need more cooler air, you need all of them. But remember more fans, more power use.
4. Light
- Some people need them coz it's look nice. More light inside you computer casing will used more power. Fan & light using 12volt from power supply but you have optional to not connect them with power.
5. USB port & Audio port
- Most of computer casing now have usb port in front panel. But careful some others don't have it. Audio port in front panel is optional. Not all computer support it coz of motherboard. Unless your motherboard support it and you always plug-in headset or audio output from front panel. In that case, I think you better.
6. Floppy rack & Card reader
- Most of computer casing have only 1 FDD rack. If you have plan to use FDD & internal card reader, better you buy computer casing which have double FDD rack. Or buy casing which have card reader already.
7. HDD & CD-ROM rack
- New casing now not use screw for your FDD, HDD and CDROM. It's using clip to make sure all hardware tight in with computer casing. For sure you still can use a screw, it's optional.
8. Optional
- Others is optional, coz some computer casing have temp reader & timer in LCD display.
So make up you mind which one you looking for. All about money, you have a lot of money, you can get all of them.
tips: Everytimes you delete something from you computer, it's will going to recycle bin and you need to empty the bin. That way can help you if you make mistake coz recycle bin can restore file that you delete before. If you want delete a file permanantly, select file which you want to delete to, press shift button (hold) and delete a file. It's make you file will delete without going into recycle bin.
HOW TO: show hidden file
follow this step by step
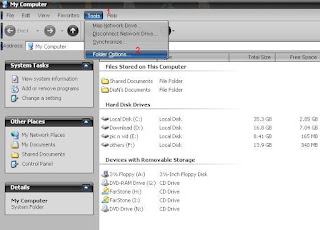
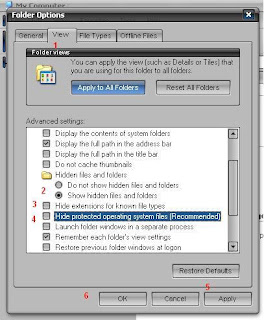
1. open your my computer & follow (1) & (2)

2. thick all of them (1 to 6)

3. now you can see all hidden file in system

tips: if you have less memory in your computer but want it perform better, disable or close any application run in startup (taskbar) example winamp agent tray, picasa startup, openoffice quickstart, msn icon, ym icon. use antivirus lite loading and set your desktop "best performance" (my computer > properties > advance > performance setting > adjust for best performance)
Thursday, June 26, 2008
HOW TO: install win98 / winme
Let say you try to install WinME using bootable cd & your cdrom drive is D:\>
Follow this step by step:
1. boot your system with cd bootable (Winme) or floppy disk (win98/winme), and select cd-rom support
2. create partition
-> create primary partition and active the partition
-> restart system
-> follow 1st step
-> type format C:
3. at command prompt types this command
-> C:
-> md winme
-> cd d: (your cdrom drive path)
4. at D:\> goto Win9x folder
-> cd win9x
5. copy all files from D:\> win9x to C:\winme>
-> copy *.* C:\win9x
6. after all files copied, you can start installation
-> C:
-> cd winme
7. at C:\winme> you can install it now
-> setup (example: C:\winme> setup)
8. follow instruction on your screen. at this point, your can remove your cd coz we now install winme source from your hdd
if you want to install win98, follow same step just change winme to win98 and win98 need boot from floppydisk.
tips: do you know what type of keyboard we used ? we used the most common modern keyboard layout called QWERTY. take a look on your keyboard. can you see the QWERTY near tab button? in others country use
Follow this step by step:
1. boot your system with cd bootable (Winme) or floppy disk (win98/winme), and select cd-rom support
2. create partition
-> create primary partition and active the partition
-> restart system
-> follow 1st step
-> type format C:
3. at command prompt types this command
-> C:
-> md winme
-> cd d:
4. at D:\> goto Win9x folder
-> cd win9x
5. copy all files from D:\> win9x to C:\winme>
-> copy *.* C:\win9x
6. after all files copied, you can start installation
-> C:
-> cd winme
7. at C:\winme> you can install it now
-> setup (example: C:\winme> setup
8. follow instruction on your screen. at this point, your can remove your cd coz we now install winme source from your hdd
if you want to install win98, follow same step just change winme to win98 and win98 need boot from floppydisk.
tips: do you know what type of keyboard we used ? we used the most common modern keyboard layout called QWERTY. take a look on your keyboard. can you see the QWERTY near tab button? in others country use
Subscribe to:
Comments (Atom)


